Showing posts with label Pranayama. Show all posts

Monday, December 19, 2011

Restoring and Rebuilding your Inner Core Part I - Finding Mula Bandha

In my previous posts I spoke quite a bit about the inner core. But what does this mean exactly? It's not just your abs - yoga doesn't care if you have a 6-pack. The important thing is to have a calm, strong, and steady center. Inner core work is vital to this process. Below, I detail the first exercise to help you start to rebuild and strengthen your core.

Exercise 1: Finding Mula Bandha (pelvic floor engagement) and Uddiyana Bandha (lower abdomen engagement)
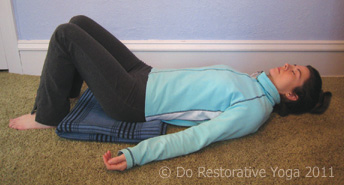

Setting up:
Start by laying on your back on the floor with your knees bent (Constructive Pose). Find a neutral pelvis - hip points and top of pubic bone are on the same plane. Do a couple of pelvic tilts and tucks to find neutral. Use extra padding (folded blankets) as needed under the bum or under the neck/head for comfort.

Find a regular, steady breath. Notice how the inhale causes the respiratory diaphragm to press down into the organs which in turn press down into the pelvic floor (this is subtle - don't worry if you can't feel it yet). The exhale returns the respiratory diaphragm to its resting "umbrella-like" position under the rib cage.

Working in the pose:
After establishing your breath, begin to exaggerate the movement of the belly and pelvic floor. On your inhale, relax everything and let the belly rise. On your exhale, pull your belly toward your spine without moving your actual spine - keep your pelvis neutral. Now you are engaging the transverse abdominus and Uddiyana Bandha. Inhale and soften again. Take a few rounds of this breath. Inhaling and relaxing, exhaling and engaging.

Adding on, we will start to find the pelvic floor muscles. On your exhale I want you to engage the pelvic floor muscles (these are the muscles between the tailbone and pubic bone and from sit bone to sit bone) and the belly muscles (transverse abdominus). Pull the pelvic floor muscles up toward the area behind your belly button and pull your lower belly back toward the spine. Don't worry if you can't figure this out at first. It takes practice. On the inhale, relax everything again. Take a few rounds of this type of breathing. Inhale and relax, exhale and engage belly and pelvic floor.

If you can imagine your muscular engagement as a dial, practice your engagement at different levels of engagement. Try about a 3, then dial it up to a 7; try a 10 (completely engaged) then dial your engagement back to a 1 or a 2. Practice these different levels to become familiar with the amount of effort it takes to engage. Why? Because you don't need to dial up your engagement to a 10 if you are only picking up a water bottle. But what if you are picking up a toddler or a heavy rock? Then you need more muscular engagement.

Finishing:
Let yourself completely relax after working Mula Bandha and Uddiyana Bandha. Take any finishing movements that you like: a long stretch, a bundle roll hug, gentle twist, etc.

Benefits of Pelvic floor work:
Helps reverse or prevent incontinence; Can assist in reversing or preventing prolapse; Improves sexual functioning; Improves your fluid movement and connection with your inner core.

Benefits of Pelvic girdle work:
Creates stability in the pelvis; Reduces back pain; Reduces SI pain; Creates a center that is unshakeable; Improves posture and stability from the inside out.

Previously: My Story Part IV: Restoring my Inner Core
Up next: More exercises to improve your core.

ps - Just 5 minutes a day of these exercises can help you. You don't even have to lay down and take time out of your day (although you should give yourself a break). You can practice your inner core engagement while you are sitting at your desk, waiting for a stop light, doing dishes, or any time you think of it.

Monday, November 22, 2010

30 Day Relaxation Challenge - Week 4

Congratulations! You are in the home-stretch of this 30 Day Deep Relaxation Challenge.

For the past 3 weeks we have practiced taking time out of our day to treat ourselves, to nourish relaxation and to find ease in our bodies. I have had a number of students comment on how they are really starting to like relaxing, how they are noticing that it feels really good to take a rest for a few moments, how much more sane they feel after stepping back and breathing. This is wonderful! This is exactly what I was hoping you would find.

This is also the time in our practice where things can fall apart. Our new habit of ease can be quickly forgotten if we do not discipline ourselves to take a few minutes each day to treat ourselves right. Continue to use your sankalpa (setting your intention), repeating it to yourself every day. This week I also want you to voice your sankalpa out loud and possibly to another person. Really put your deepest desire out there to the world. And continue to do your other homework: claiming 10-15 minutes (or more) each day for 30 days to consciously relax.

For our first week we practiced building breath awareness with Equal Breathing or Sama Vritta Pranayama.  The 2nd week we learned the 3-Part Breath or Dirga Pranayama. The 3rd week we learned one of my favorite breath practices: 2 to 1 Breathing, and this week we will expand our breath practice with the Sweeping Breath. This practice starts by imagining the breath sweeping through the body from soles to crown and back down to soles. There is a short version, long version and an even longer version. I'm going to talk you through the short version but I encourage you to try either version from Deborah Adele or Dr. Louise Montello too. Links are below.

Short Version:
If you just need a quick pick-me-up imagine breathing from the soles of the feet, up through the whole body to the crown of the head, and then exhaling from the crown of the head down to the soles of the feet. Do this about 5 times or until you feel refreshed.

Long Version:
Start the same way. Imagine breathing from the soles of the feet, up through the whole body to the crown of the head, and then exhaling from the crown of the head down to the soles of the feet. The next time you sweep the breath down from the crown stop at the knees. Then breath to the hips, then  hips to crown to belly, belly to crown to heart, heart to crown to throat, throat to crown to brow-point, brow-point to crown to brow-point, and back down the body in the same order. Deborah Adele details this version in her CD, The Art of Relaxation.

Longest Version:
Do the same as the long version but take 5 breaths at each stopping point. For example, 5 sweeping breaths from soles to crown and crown to soles, then 5 sweeping breaths from knees to crown and crown to knees, then 5 sweeping breaths from hips to crown and crown to hips, etc. until you have gone both up and back down the body. Dr. Louise Montello details this practice in her CD, Relax Into Wellness II.

I'm taking you through the short version in the practice below.

Sweeping Breath: 1min46sec.


The postures we learned this week are Laying on the Therapeutic Spinal Strip and Supported Reclining Twist.

Laying on the Therapeutic Spinal Strip

Step 1: Use a short strip or fold your long strip in half and place it on the floor behind you. Lay down on it and check for placement by finding the soft spot just below the breast bone. (If you don't have a spinal strip you can use a rolled up mat.) The spinal strip should be just opposite that soft spot where your finger tips are resting. Keep one hand at the soft spot and run the other hand behind your back to check for placement.
Step 2: Once you are laying down notice if you have any discomfort in the low back or if your lower ribs are flaring up. If either of these things are happening you need to lift your hips up and place a folded blanket under your hips/sacrum area. Keep your knees bent.
Step 3: If you still have discomfort or flared ribs, unfold your strip and lay on it in a single layer. If you feel like your chin is higher than your forehead place a pillow or folded blanket under your head.
Step 4: Lay for 5-15 minutes, allowing the shoulders to settle in around the black strip. Focus on your breathing. To come out of the pose or if at any point laying on the strip becomes uncomfortable, push the blanket out from under you, roll gently to one side, push the strip out of the way and then lay back down on your back in Savasana.

Supported Reclining Twist


Coming into the pose:
Lay on your back with your knees bent. Have a support ready on each side of your body. Shift your hips to one side and let your knees fall to the other side. Snuggle a bolster under your back hip and bum to support staying in the twist and let the stacked knees rest on a second bolster as they fall towards the floor. Try to keep the shoulders on the floor, keep the heart center open by extending the arms away from the body, palms facing up, and let the head turn away from the knees. Stay as long as you are comfortable.

Changing sides:
Let the head come back to center. Remove the support from under the back hip. Engage the core slightly to support the spine and then bring the legs back to upright, helping the legs with the hands if needed. Settle into the second side the same way as the first and try to stay here an equal amount of time.

Exiting the pose:
Let the head come back to center and then keep turning towards the knees. Remove the props from under the knees, lay on your side for a few breaths, and then gently push yourself back to an easy seated position.

Next week is our last class room meeting. We will learn our final postures and one new breath practice. I encourage you to continue to journal your experiences, noticing how you feel, and taking note of any changes in your attitude, mind, body or spirit.

Best of luck relaxing. Enjoy!

Monday, November 15, 2010

30 Day Relaxation Challenge - Week 3

Congratulations! You are at the half-way point in this 30 Day Deep Relaxation Challenge.

My hope for you is that by creating a new habit of softness in your breath and body, and by setting your intention (sankalpa) and repeating it to yourself every day, that you will start to feel an opening, an ease in your body and your life. Check back in your journal and see how you were feeling at the beginning of the practice. Then take stock of how you feel now. Note any differences. Note if there are not any differences. Continue to do your homework, claiming 10-15 minutes (or more) each day for 30 days to consciously relax.

For our first week we practiced building breath awareness with Equal Breathing or Sama Vritta Pranayama.  The 2nd week we learned the 3-Part Breath or Dirga Pranayama. This week we will learn one of my favorite breath practices: 2 to 1 Breathing.

2 to 1 Breathing: 2min48sec.

The postures we learned this week are Supported Lumbar Stretch and Supported Side Reclining Twist.


 Supported Lumbar Stretch

To do the Supported Lumbar Stretch, get yourself a felted pad or a firm blanket or even a big towel (like a beach towel) and make a roll that is about a handful for you. Lay down, bend your knees, lift your butt off the floor and come into little bridge pose. Place your roll under you so it is at your waist - center it behind your bellybutton. Now start to lower your seat towards the floor, arching your spine over the roll.  When you settle your seat down to the floor, your back should feel like "Ahhhh" not "Ow, ow, ow." You should not look over arched. Your belly is not raised by the roll under your back. If you are not comfortable, lift your seat (into little bridge again) and make your roll smaller until your back is happy. Sit on the tail of the blanket if you have extra. Conversely, if you feel nothing, you will need to lift your seat into little bridge and make your roll a little bigger. Please click here to view the main post on this pose to see additional pictures and instruction.

Supported Side Reclining Twist


To come into Supported Side Reclining Twist, sit on your shins on the floor with a bolster at your side (next to one thigh). The bolster should extend long-ways away from the body. Let your seat slide off of your legs towards your bolster / blankets so that you are seated with your knees bent and your feet are slightly away from your body, off to one side. Turn the torso so the belly is facing the bolster, place one hand on either side of the bolster, lengthen the spine, then start to lay the body down on the bolster for a side-reclining, supported twist. Head can rest facing either side. Arms can rest in a comfortable position. Take this pose on each side for about the same length of time. Fore more details on this pose click here.

Next week we will learn 2 more poses and a new breath practice. I encourage you to continue to journal your experiences, noticing how you feel, and taking note of any changes in your attitude, mind, body or spirit.

Best of luck relaxing. Enjoy!

Monday, November 8, 2010

30 Day Relaxation Challenge - Week 2

Congratulations! 
You made it through your first week of the 

You are creating a new habit of softness in your breath and body. This week we have two new postures, a new breath practice and a new guided meditation and deep relaxation practice.

Remember, the "challenge" part of this class is the homework - you must claim 10-15 minutes (or more) each day for 30 days and consciously relax. Also, continue to repeat your sankalpa (intention) to yourself 3x both before and after your relaxation practice to help your deepest desire come to fruition. Continue to journal if this is helpful to you.

For our first week we practiced building breath awareness with Equal Breathing or Sama Vritta Pranayama. Our breath practice will start this way every time and then we may move into a different breath practice. This week we will practice the 3-Part Breath or Dirga Pranayama.

3-Part Breath: 3min43sec.

The postures we learned this week are Legs-up-the-Wall and Supported Reclining Bound Angle.

Legs up the Wall


Legs up the wall pose is a great pose to do if you don't have any props. All you need is a wall. It can be a little tricky to come in to but once you get the hang of it you'll be hanging around upside down all the time.

Getting into this pose is very much like getting into Legs on a Chair pose. Sit down next to the wall with one hip towards the wall. As you start to lay back, you must also swing your legs up and your body around so your bottom is towards the wall. When you are turned tail to the wall, settle your body on the floor and your legs up the wall.

If you cannot straighten your legs or if your tail is curling up, you are too close to the wall. Push yourself back a little. Now your legs won't be straight up, they will be more at a slant, but that's ok. Let yourself soften here. Watch your breath. Let the belly rise and fall naturally with the breath. Let the arms rest out to the sides, palms up. Stay here for as long as you are comfortable. For more information and variations on this pose click here.

Supported Reclining Bound Angle

 Supported Reclining Bound Angle

Sit on the floor in front of a pile of pillows, folded blankets or a bolster propped up at a slant. Lay back on your bolster/pillow pile. Allow your knees to open out to the sides, resting them on pillows, blocks or blankets for comfort. Draw your feet in close to the body. Let the arms rest out at your sides, palms facing up. There should be no strain on the shoulders or neck from the arms pulling down towards the floor. Support the arms with blocks, blankets or pillows as needed. Close the eyes and try to keep your attention on watching the breath. Stay as long as you like. For more information and variations on this pose click here.

In the coming weeks we will learn more poses and more breathwork. I encourage you to continue to journal your experiences, noticing how you feel, and taking note of any changes in your attitude, mind, body or spirit.

Best of luck relaxing. Enjoy!

Monday, November 1, 2010

30 Day Relaxation Challenge - Week 1

The Art of RelaxationWelcome to your first week of the 30 Day Deep Relaxation Challenge.

The "challenge" part of this class is the homework - you must claim 10-15 minutes (or more) each day for 30 days and consciously relax. We will learn relaxation techniques in class which you can bring home with you including postures, breathwork and meditation. Part of your class fee includes The Art of Relaxation by Deborah Adele. You can use this CD anytime, using any of the practices, throughout this month (and beyond). (If you are not in the challenge but would like to try this practice, click on the image to go to Yoga North's store to buy this CD or click here to buy from CD Baby.)

Before starting this challenge consider taking stock of how you feel in your life right now and then writing it down in a journal. Also, set your sankalpa (intention) by thinking of your deepest desire and phrasing it into a positive statement such as, "I am whole, healthy and happy" or, "I am one with all" or, "May I be happy with what life brings me." Repeat your sankalpa to your self 3 times before your practice and 3 times at the end of your practice to help bring your intention to fruition.

A great way to find relaxation is through the breath. For our first week we practiced building breath awareness with Equal Breathing or Sama Vritta Pranayama. Any time you can bring your awareness to your breath, you can bring your body and mind into balance and calmness. You can practice while you are driving, sitting at the computer, or during a conversation where you find yourself getting upset. Conscious breathing brings a relaxed and focused state of mind. Take long deep breaths, both in and out, relax the belly and breathe. Listen to the instructions for Equal Breathing below.

Equal Breathing: 2min35sec.

The postures we learned this week are Legs on a Chair and Supported Child's Pose.


Legs on a Chair

Sit down in front of a chair or couch with the seat of the chair/couch towards you. Sit with one hip facing your prop. As you start to lay back, you must also swing your legs up and your body around so your bottom is towards the chair. When you are turned tail to the chair, settle your legs onto the chair's seat, making sure they are completely supported from the backs of the knees down to the feet. For a more complete description click here.

Supported Child's Pose

Sit on your shins, knees spread wide around the bolster/pillow-pile in front of you. Lay forward in Child’s Pose resting the body over the bolster. Arms can rest forward or behind, the head should take equal time being turned to each side. Make sure to have enough support under the belly. You don't want any strain in your back. Add props as needed. For a more complete description click here.

In the coming weeks we will learn more poses and more breathwork. I encourage you to journal your experiences starting with how you feel before you start this practice, and then continue journaling as the challenge continues, noticing how you feel, and taking note of any changes in your attitude, mind, body or spirit.

Best of luck relaxing. Enjoy!

Breathing for Relaxation

The 30 Day Deep Relaxation Challenge starts today (Monday, November 1st, 2010). I just found this article on Yoga Journal about breathing for relaxation. We will practice this throughout November in addition to other breath practices, postures and meditation.

Breathing for Relaxation

How simple breath work can lead you to a deep state of relaxation.

By Claudia Cummins

Beginning students often ask for instructions on the "right" way to breathe. Alas, there's no single answer to that question, since the optimal breathing pattern at any given moment depends on the type of practice. Restorative yoga focuses solely on relaxation, though, and emphasizes breathing that creates calm and serene states of being. When you settle into restorative poses, try the following techniques for cultivating breathing patterns that are hallmarks of relaxation and well-being.

Move the Belly with the Breath
When we are at ease, the diaphragm is the primary engine of the breath. As we inhale, this domelike muscle descends toward the abdomen, displacing the abdominal muscles and gently swelling the belly. As we exhale, the diaphragm releases back toward the heart, enabling the belly to release toward the spine.

Keep the Upper Body Quiet
During high-stress times, it's common to heave the upper chest and grip the muscles in the shoulders and throat. When we're at rest, the muscles of the upper chest remain soft and relaxed as we breathe, and the real work occurs in the lower rib cage. To promote this type of breathing pattern, consciously relax the jaw, throat, neck, and shoulders, and envision the breath sweeping into the deepest parts of the lungs as you breathe in and out.

Breathe Easy
Although some breaths may be deeper or faster than others, when we're relaxed, the alternating rhythm of the inhalations and exhalations feels like a lullaby—smooth, soft, and uninterrupted by jerks and jags. Consciously relaxing into this wavelike, oceanic quality of the breath deepens our sense of peace and ease.

Lengthen the Exhalations
When we feel stressed, our exhalations tend to grow short and choppy. When we're relaxed, though, the exhalations extend so completely that they are often longer than the inhalations. Some teachers even instruct that if we're deeply relaxed, each exhalation will be twice as long as the inhalation. To facilitate this, try gently extending each exhalation by one or two seconds.

Pause After Each Exhalation
In our most relaxed state, the end of each exhalation is punctuated by a short pause. Lingering in this sweet spot can be deeply satisfying and can evoke feelings of profound quiet and stillness.

Let the Whole Body Breathe
When we are at ease, the whole body participates in the breathing process. Imagine a sleeping baby: When he breathes in and out, the belly swells and releases, the hips rock to and fro, the shoulders bob, and the spine gently undulates. This offers a mini-massage for the muscles and organs of the whole body, and turns each breath into a soothing melody that further calms and quiets every cell within.

Claudia Cummins teaches yoga in central Ohio. Visit www.claudiacummins.com to read a selection of her essays.

Sara's Note: If you can really focus in on how your breath feels in your body you can get into a sweet spot of complete absorption with your breath. Notice how the belly moves, notice how the shoulders move, notice any pauses in your breath and how that makes you feel. This Pranayama (breath) practice is part of the process of the 8-fold path. This will bring us towards Pratyahara (Sense withdrawal, directing the attention inwards), Dharana (Concentration, developing one-pointed focus), Dhyana (Deep meditation, heightened awareness of oneness or unity) and finally, Samadhi (Enlightenment, Awakening, Oneness, Nirvana, Unity, Bliss). So let's breathe! 

Thursday, March 25, 2010

Deep Relaxation Workshop coming up 4/7/2010

Join us at Yoga North for a Deep Relaxation Workshop on Wednesday evening, April 7th.

Rest your body, rest your mind & renew your spirit with Deep Relaxation. Relieve stress, build awareness & bolster your health with Deep Relaxation. In this workshop we will practice Breathwork, Relaxation Techniques, Guided Meditation & Imagery. Settle into the Quietude of Deep Relaxation.

Benefits of Deep Relaxation include: boosting the immune system, lowering blood pressure, and relieving fatigue, anxiety and insomnia without medication. Deep Relaxation contributes to an overall feeling of well-being. Shake off the last of winter and refresh yourself for spring with this mini-retreat.

Teacher: Sara Duke
Date: Wednesday 4/7/2010
Time: 6:30-8:30 pm
Cost: $25 in advance ($30 at the door)

Advance Registration Encouraged. To register or for more details visit Yoga North or call the office at 218-722-YOGA.

Looking forward to seeing you there. Namaste.

Wednesday, March 17, 2010

Balancing Act

Awareness of the ida and pingala nadis can help you develop a balanced practice—and clear the way for your spiritual growth.

By James Bailey

A student of the great Indian poet Kabir once asked him, "Kabir, where is God?" His answer was simple: "He is the breath within the breath." To understand the profound implications of Kabir's reply, we need to look beyond the physical components of breath—the oxygen, carbon dioxide, and other molecules that stream in and out with our every inhalation and exhalation. Beyond this breath—yet within it—is prana, the universal vital energy that is quite literally the stuff of life. For those of us who practice yoga, the challenge is to harness this energy so it can fuel our physical, mental, and spiritual development. To do this, we need to look deeply into the mysteries of the mind and the subtle body. Fortunately, the early practitioners of Tantra voyaged into this inner landscape, mapping the many ways energy circulates within us. Among their most important discoveries were the nadis, the vast network of energy channels that makes each individual an integrated, conscious, and vital whole.

The Sanskrit word nadi derives from the root nad , which means "flow," "motion," or "vibration." The word itself suggests the fundamental nature of a nadi: to flow like water, finding the path of least resistance and nourishing everything in its path. The nadis are our energetic irrigation system; in essence, they keep us alive.

According to many Tantric texts, the human body contains 72,000 nadis that channel prana to every cell. Some are wide and rushing; others are a mere trickle. When this system flows freely, we are vital and healthy; when it becomes weak or congested, we struggle with poor mental and physical health. The practices of hatha yoga are so effective because they strengthen the flow of prana in our bodies, invigorating the current so that it carries away obstructions that block the free flow of energy.

Because nadis—like the chakras (psychoenergetic power centers), prana, and other aspects of the subtle body—don't show up under microscopes, medical science has relegated them to the realm of the merely metaphorical. But traditional yogis believe that the subtle body is real, and that understanding it and working with it complement and counterbalance the emphasis on gross physical anatomy that predominates our current yoga culture.


Night and Day
Three nadis are of particular interest to yogis. The sushumna (most gracious) nadi is the body's great river, running from the base of the spine to the crown of the head, passing through each of the seven chakras in its course. It is the channel through which kundalini shakti (the latent serpent power) —and the higher spiritual consciousness it can fuel—rises up from its origin at the muladhara (root) chakra to its true home at the sahasrara (thousandfold) chakra at the crown of the head. In subtle body terms, the sushumna nadi is the path to enlightenment.

The ida (comfort) and pingala (tawny) nadis spiral around the sushumna nadi like the double helix of our DNA, crossing each other at every chakra. If you visualize the caduceus, the symbol of modern medicine, you'll get a rough idea of the relationships among the ida, pingala, and sushumna nadis. Eventually, all three meet at the ajna (command) chakra, midway between the eyebrows.

The ida nadi begins and ends on the left side of sushumna. Ida is regarded as the lunar nadi, cool and nurturing by nature, and is said to control all mental processes and the more feminine aspects of our personality. The color white is used to represent the subtle vibrational quality of ida. Pingala, the solar nadi, begins and ends to the right of sushumna. It is warm and stimulating by nature, controls all vital somatic processes, and oversees the more masculine aspects of our personality. The vibrational quality of pingala is represented by the color red.

The interaction between ida and pingala corresponds to the internal dance between intuition and rationality, consciousness and vital power, and the right and left brain hemispheres. In everyday life, one of these nadis is always dominant. Although this dominance alternates throughout the day, one nadi tends to be ascendant more often and for longer periods than the other. This results in personality, behavior, and health issues that can be called ida-like or pingala-like.

Ida-like individuals have lunar, or nurturing, qualities but may lack the verve to sustain a strong yoga practice. They are full of potential, but unless they develop their pingala side may never manifest that potential in either worldly affairs or spiritual development. Pingala-like individuals have solar qualities: type A personalities, lots of creativity, abundant vitality. But unless they develop their ida side, they may lack the quietude, introspection, and receptivity necessary to yield to the grace of spiritual awakening.

Creating Equilibrium
Bringing ida and pingala into equilibrium is a major focus of hatha yoga—so important, in fact, that the term hatha symbolizes this balance. Although the word hatha literally means "forceful" in Sanskrit, it is composed of ha and tha, two esoteric bija (seed) mantras that have arcane meaning and power. Ha represents the solar qualities, the vital force, of pingala; tha represents the mind and the lunar qualities of ida. Balancing sun and moon, or pingala and ida, facilitates the awakening and arising of kundalini, and thus the awakening of higher consciousness. In fact, some yoga teachings hold that as long as either ida or pingala predominates, sushumna stays closed and the power of kundalini lies dormant.

The most powerful method of balancing ida and pingala is Nadi Shodhana, alternate-nostril breathing. (Literally, the Sanskrit means "nadi cleansing.") This practice is effective because the ida nadi is directly connected to the left nostril, and the pingala nadi to the right. A few rounds of this basic pranayama technique at the end of an asana practice are an excellent way to help restore equilibrium between the two nadis and to compensate for any imbalance you may have inadvertently caused during your practice.

Coming into Balance
To practice Nadi Shodhana, sit in a comfortable meditative position. Make a fist with your right hand, then partially reextend your ring and little fingers. Lightly place the pad of the thumb on your nose just to the right and below the bridge; lightly place the pads of your ring and little fingers on the corresponding flesh on the left side of your nose. Gently pressing with the ring and little fingers to close the left nostril, exhale fully through the right. Then inhale fully through the right, close it with the thumb, release the left nostril, and exhale through it. Inhale through the left nostril, close it with the fingers, release the right nostril, and exhale through it. This completes one round of Nadi Shodhana.

In addition to using Nadi Shodhana, you can experiment with using the asanas themselves as a method of balancing ida and pingala. At the beginning of a practice, sit and observe your breath to see which nostril—and, hence, which nadi—is dominant. (If you can't tell, try a few rounds of alternate-nostril breathing-it should be immediately clear which side is freer and which feels more inhibited). If the left nostril dominates, ida is in charge, and you might consider focusing your attention on invigorating asanas—such as backbends, standing poses, inversions, and twists—to engage the pingala nadi. If the right nostril dominates, the cooling, calming energy of seated poses and forward bends might be most beneficial.

You can also bring awareness of ida and pingala into any asana practice by pausing between poses to notice which nadi dominates your breathing. Notice your mind-states as well; you will find they closely correlate with which nadi is ascendant. Are you agitated and active (pingala-like) or calm and receptive (ida-like)? Through this checking-in process, you can begin to identify which poses activate one nadi or the other, and which are particularly effective—for you, at least—in creating physical and emotional equilibrium. You'll also be developing your awareness, deepening your practice, and clearing the way for your spiritual growth.

Sara's note: This article it taken from Yoga Journal online from the Wisdom section. Visit the site by clicking here. For an example of how to practice Nadi Shodhana go to this post: Alternate Nostril Breathing.

Tuesday, March 2, 2010

Alternate Nostril Breathing

Alternate Nostril Breathing or Channel Cleansing Breath ~ Nadi Shodhana

I like to do this practice at either the beginning or end of class (or both) to bring calmness to the body and mind and to balance the energy in the body.

Benefits: This breath is balancing, relaxing, and calming.

Practice: Begin in a comfortable seated position. Establish a smooth steady breath. Using your right hand, fold your index and middle fingers into your palm, leaving your thumb, ring finger, and pinky sticking up. Bring your thumb to the right side of your nose and your ring finger to the left side.

Close off your right nostril with your thumb. Inhale through your left nostril. Close off your left nostril with your ring finger. Open and exhale through your right nostril. Inhale through your right nostril. Close off your right nostril with your thumb. Open and exhale through your left nostril. Inhale through your left nostril. Take 5 to 10 rounds, alternating nostrils.

Doing 5 rounds of this practice would look like this:

Inhale left, exhale right;
Inhale right, exhale left.

Inhale left, exhale right;
Inhale right, exhale left.

Inhale left, exhale right;
Inhale right, exhale left.

Inhale left, exhale right;
Inhale right, exhale left.

Inhale left, exhale right;
Inhale right, exhale left.

Return to regular, smooth, steady breathing.

However, there are multiple styles to Nadi Shodhana. Some advocate doing 5-10 rounds on one side (inhale right, exhale right, repeat) and then switching and doing 5-10 rounds on the other side.

Doing 5 rounds of this practice would look like this:

Inhale right, exhale right;
Inhale right, exhale right.

Then switch:

Inhale left, exhale left;
Inhale left, exhale left.

Return to regular, smooth, steady breathing.

Another method is to do this practice as a circular breath: inhale right, exhale left and repeat for 5-10 rounds, then switch and inhale left, exhale right for 5-10 rounds.

Doing 5 rounds of this practice would look like this:

Inhale right, exhale left;
Inhale right, exhale left.

Then switch:

Inhale left, exhale right;
Inhale left, exhale right.

Return to regular, smooth, steady breathing.

Regardless of how you do this practice, the point is to bring balance to the body and to the subtle body or energy body. This breath can be practiced anytime throughout the day.

Wednesday, February 17, 2010

Building Breath Awareness

Finding Equal Breathing - Sama Vritti Pranayama
Breath Awareness or Conscious Deep Breathing is one of the simplest ways to calm and integrate the mind and body. The body is always breathing. You are always breathing. The first step toward having the breath be your ally is to become more aware of it. The next step is to make subtle shifts that will allow the breath to be easier and deeper. You might notice that your belly is tight and the breath is shallow. Or, the exhale is quick and unconscious while the inhale is almost non-existent. Whatever your particular patterns are, here are some simple directions toward breathing well and being well.

Soften the Belly
When breathing, the diaphragm should be relaxed enough that your abdominal wall rises and falls with the breath. Your belly should expand and fill when you inhale, and empty completely when you exhale. If you are an athlete, with a muscular stomach, give yourself time and practice when learning how to relax this vital area.

Diagnose Imbalances
It is ideal if the length of both inhale and exhale are approximately the same. As you pay attention to your breathing, you may first find that your belly is not moving. Correct this by practicing softening, relaxing, and stretching the abdominal wall, in addition to allowing long relaxed breaths, both in and out. As your breath becomes balanced, your mind becomes balanced. As your deep breath becomes a way of being, your body and mind becomes robust and serene at the same time.

Stretching and Bodywork
People often have difficulty breathing deeply because the back muscles and intercostals (around and between the ribs) are too tight. Stress, lack of exercise, too much exercise, or bodily held feelings often cause the muscle groups around torso to restrict the movement of the rib cage. As stress and holding dissolves, the breathing parts (belly, diaphragm, ribs, lungs, and back) can move in an easier way. The diaphragm opens more. The chest and back muscles soften, creating more ease for the rising and falling of the ribs. Stretching, stress reduction, meditation, bodywork, general relaxation, and emotional release all contribute toward dissolving body armor and making the body more open.

Practice Breath Awareness
It is not likely that you will always be aware of your breathing. Therefore, I suggest that you set aside times to practice and focus upon the breath. I like to practice slow deep breathing when I am working at the computer, when driving on long stretches of open road, when giving bodywork, and as a way to begin meditation. It tends to foster a relaxed, focused state of mind. Take long deep breaths, both in and out, relax the belly, breathe, flow, and go. My meditation always begins with a few moments of being mindful of the breath.

The breath can also be used to open the heart. In Tonglen Buddhist meditation, you practice breathing in the suffering of all beings around you. On the exhale you release and send any happiness or joy you have. Or, you can contemplate all the dualities of life. Breathe in, life is born. Breathe out, life dies. Breathe in, day. Breathe out, night. Breathe in, yin. Breathe out, yang.

Breathing is so basic. It is one of the easiest things to miss. And that is also how our essential nature is: basic, natural. But, we have habits of complicating this. Then we spend years trying to shed our complications. However and whenever you consciously breathe, do it with awareness, an attitude of good health, and a love for yourself, and all of life.

Sara's Note: I found this article on About.com: http://healing.about.com/od/breathwork/a/consciousbreath.htm

Saturday, February 6, 2010

Three Part Breath

Three-Part or Complete Breath ~ Dirga Pranayama

I like to bring my students into breath awareness by practicing 3-Part Breath at the beginning of class.

Benefits: Focuses the attention on the present moment, calms and grounds the mind.

Practice: Begin by becoming aware of the breath: How does it feel to inhale and exhale? Is your breath smooth, steady, and without pause? When you are settled in with breath awareness, come to equal breathing (Sama Vritti Pranayama): same count inhale, same count exhale.

When you have established yourself in your breath, bring your right hand to your belly and feel the breath pushing the belly out on the inhale and feel the belly draw back into the body on the exhale. No forcing. This happens naturally. Breathe this way at least 5 complete breath cycles.

Next, bring your hands to your side ribs and start to feel the ribs expand into your hands on the inhale and draw back into the body on the exhale. If you can’t feel this you may need to bring some muscular work into it by consciously expanding the rib cage. Breathe this way at least 5 complete breath cycles.

Finally, put one hand between the belly and the ribs and the other hand up on the upper chest. Now bring the breath all the way up into the upper chest after you have filled the belly and ribs. Push the breath into the back body as well as the front body. Expand from the bottom of the belly to the top of the shoulders, into both side bodies, and into the back body. Breathe this way at least 5 complete breath cycles. Then return to smooth, steady breathing but continue to maintain your mind's focus on the breath as you move out into your day or into your practice.

Friday, May 22, 2009

Restorative Yoga Breathing

2 to 1 Breath

There is a type of breathing I especially like for Restorative class. It is called 2 to 1 Breathing. This means that you will extend your exhale to take twice as long as your inhale takes.

To start out, close your eyes and settle into your body. Bring your attention to your breath. Notice the belly bellowing out on the inhale and drawing back into the body on the exhale. You are not making this happen, it is happening naturally. Sit here for about 5-10 breaths, settling in to the body and quieting the mind.

Now start to notice how many counts it takes you to inhale and how many counts it takes you to exhale. In normal breathing the counts should be about equal. For me it is about 2-3 counts for both inhale and exhale. Notice this breathing pattern for about 5-10 breaths.

Next, start to nudge your exhale to take longer than your inhale. You are now controlling your exhale, drawing it out, extending it to 2 times the length of your inhale. So, if your inhale takes 2 counts, your exhale should now be 4 counts, or if your inhale was 3 counts, your exhale should be 6 counts. Practice this 2 to 1 Breath for 5-10 counts. If you start to feel panicky let go of the 2 to 1 Breathing and go back to regular, even breathing. If you like this breath continue for the full 5-10 rounds.

When you have competed 5-10 rounds of 2 to 1 Breathing let go of the control of the exhale and return to even, steady breathing, equal counts on the inhale and the exhale. Let your attention come back to the body and then back to the outside world. Continue on with your day.

2 to 1 Breathing is calming, helps relieve stress and soothes the body. Use this breath anytime before or after practice, at work, at home, or any time you are feeling stressed out and just need a quick "breather."

Namaste.

Tuesday, May 12, 2009

Therapeutic Teacher Training Ah-ha's

Are you Married to Your Breath?

This is a good one. Watch yourself move, watch yourself breathe, watch yourself breathe and move. Can you move counter to what you have trained yourself? Can you exhale when you open your chest and inhale on contraction? Sounds backwards I know. And it feels backwards too but the point is....Are you married to your breath and/or your movement patterns?

A couple of examples...

1. We were practicing Marching Abs (bent knee leg lifts) with an engaged core. I noticed that I could not lift a leg until I had taken a deep inhale and a full exhale (to relax? to prepare? for what purpose?). Only then could I engage my core with purpose and lift a leg. I was stuck in a breath and movement pattern. I had practiced this pattern so many times that it almost became a superstition: inhale-exhale-relax-engage core-lift leg. I couldn't lift my leg without the first 4 steps happening in exactly that way. Now, after practicing this I am starting to be able to engage my core and lift my leg without the first 3 steps. But I still want to revert to my pattern. Curious.

2. Another woman was not stuck so much in a breath pattern as a movement pattern but the example is still relevant. We were practicing finding a twist solely from our torsos by moving from the spine first. We were laying on one side with bent knees, top arm raises to point at the sky and then you try to twist open, bringing the heart center towards the sky without leading with the arm and without letting the top knee slide off the bottom knee. Her issue was that she couldn't lift her arm to the sky without twisting at the same time. Normally she can move her arm, but in this particular exercise she became so stuck that she couldn't lift her arm at all without her habitual movement pattern. Someone helped her lift her arm skyward a few times, she developed a new pattern and was able to move her arm without twisting. Interesting.

I invite you to watch yourselves. Watch your breath, watch your movement, watch your breath and your movement together. Notice your habits, experiment, play, and have fun with this.

Namaste.