Monday, December 19, 2011

Restoring and Rebuilding your Inner Core Part I - Finding Mula Bandha

In my previous posts I spoke quite a bit about the inner core. But what does this mean exactly? It's not just your abs - yoga doesn't care if you have a 6-pack. The important thing is to have a calm, strong, and steady center. Inner core work is vital to this process. Below, I detail the first exercise to help you start to rebuild and strengthen your core.

Exercise 1: Finding Mula Bandha (pelvic floor engagement) and Uddiyana Bandha (lower abdomen engagement)


Setting up:
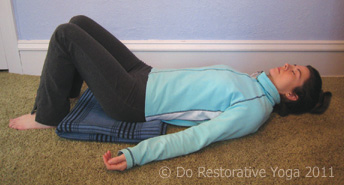
Start by laying on your back on the floor with your knees bent (Constructive Pose). Find a neutral pelvis - hip points and top of pubic bone are on the same plane. Do a couple of pelvic tilts and tucks to find neutral. Use extra padding (folded blankets) as needed under the bum or under the neck/head for comfort.

Find a regular, steady breath. Notice how the inhale causes the respiratory diaphragm to press down into the organs which in turn press down into the pelvic floor (this is subtle - don't worry if you can't feel it yet). The exhale returns the respiratory diaphragm to its resting "umbrella-like" position under the rib cage.

Working in the pose:
After establishing your breath, begin to exaggerate the movement of the belly and pelvic floor. On your inhale, relax everything and let the belly rise. On your exhale, pull your belly toward your spine without moving your actual spine - keep your pelvis neutral. Now you are engaging the transverse abdominus and Uddiyana Bandha. Inhale and soften again. Take a few rounds of this breath. Inhaling and relaxing, exhaling and engaging.

Adding on, we will start to find the pelvic floor muscles. On your exhale I want you to engage the pelvic floor muscles (these are the muscles between the tailbone and pubic bone and from sit bone to sit bone) and the belly muscles (transverse abdominus). Pull the pelvic floor muscles up toward the area behind your belly button and pull your lower belly back toward the spine. Don't worry if you can't figure this out at first. It takes practice. On the inhale, relax everything again. Take a few rounds of this type of breathing. Inhale and relax, exhale and engage belly and pelvic floor.

If you can imagine your muscular engagement as a dial, practice your engagement at different levels of engagement. Try about a 3, then dial it up to a 7; try a 10 (completely engaged) then dial your engagement back to a 1 or a 2. Practice these different levels to become familiar with the amount of effort it takes to engage. Why? Because you don't need to dial up your engagement to a 10 if you are only picking up a water bottle. But what if you are picking up a toddler or a heavy rock? Then you need more muscular engagement.

Finishing:
Let yourself completely relax after working Mula Bandha and Uddiyana Bandha. Take any finishing movements that you like: a long stretch, a bundle roll hug, gentle twist, etc.

Benefits of Pelvic floor work:
Helps reverse or prevent incontinence; Can assist in reversing or preventing prolapse; Improves sexual functioning; Improves your fluid movement and connection with your inner core.

Benefits of Pelvic girdle work:
Creates stability in the pelvis; Reduces back pain; Reduces SI pain; Creates a center that is unshakeable; Improves posture and stability from the inside out.

Previously: My Story Part IV: Restoring my Inner Core
Up next: More exercises to improve your core.

ps - Just 5 minutes a day of these exercises can help you. You don't even have to lay down and take time out of your day (although you should give yourself a break). You can practice your inner core engagement while you are sitting at your desk, waiting for a stop light, doing dishes, or any time you think of it.

Monday, December 12, 2011

Winter Wonder Yin

I'm taking a little break from writing about the inner core to bring you a bit of info about keeping healthy and stress-free over the winter and the holidays. The following article from Yoga Journal explains the TCM (Traditional Chinese Medicine) perspective on winter, the holidays, and learning to keep rhythm with our body's natural cycle.

An acupuncturist explains why the final month of the year, an inherently yin season, is not the time to indulge in yang activities like shopping, partying, and staying up late. By Laurel Kallenbach

The final few months of the year often find us in a frantic state of shopping, decorating, traveling, and other high-energy activity. Yet instead of having fun, we often end up feeling ill, anxious, or depressed. The reason, according to Taoist philosophy and traditional Chinese medicine, is that the action-packed schedules we keep at this time of year fall out of sync with the earth's natural cycles.

"We naturally have less energy to burn during the winter," explains acupuncturist Carolyn Cohen, L.Ac., who teaches at Yo San University, a college of traditional Chinese medicine (TCM) in Santa Monica, California. "So when we engage in behaviors more appropriate for summer—staying up late and dashing around town—it's no wonder that the forced cheer of the holiday season can wear a bit thin."

Taoist philosophy conceptualizes universal balance in terms of yin and yang, complementary forces that govern the universe. Yin characteristics are cool, wet, slow, feminine, and quiet, whereas yang is the opposite: warm, dry, fast, masculine, extroverted. Winter, the yin season, is a time for storing and conserving energy in the way a bear retains fat by hibernating, or a farmer stores food for the cold months ahead.

In agrarian cultures, people spend the shortest, darkest days indoors by the fire, eating warm, slow-cooked, nourishing food and sharing stories with their families. The incongruity between winter's restful, introspective, yin nature and the frenetic way many Americans spend their holidays can contribute to seasonal affective disorder, depression, exhaustion, and other manifestations of what is known in TCM as shen (or spiritual) disharmony.

"Winter solstice, just three or four days before Christmas, is the darkest, most yin day of the year," says Cohen. "Instead of turning inward, we're celebrating with excess and yang activity. This artificiality creates stress, and many people dread the season as a result."

To stay balanced during winter, suggests Cohen, conserve your yang energy. Restorative yoga, tai chi, qigong, and walking are best suited for yin season, as they safeguard your energy reserves. "Think of these practices as an investment of your 'energy paycheck,'" says Cohen. "Don't use up what little winter energy you have with overactivity and added stress."

Eating cooked, spicy yang foods provides another good way to replenish energy. Prepare yang-strengthening soups, slow-simmered stews, beans, roasted root vegetables, and warm drinks. Add yang spices such as garlic, ginger, black pepper, cloves, and basil to increase the warming effect. Minimize your intake of yin foods such as raw vegetables, salad greens, and cold drinks.

If you find quiet, more modest ways to celebrate the holidays, you'll stay in tune with the season and feel less need to release tension by overeating or rampant spending. You'll also have more time and energy to connect with close friends and family. If you're out of sync with the mall mobs with maxed-out credit cards, chances are you'll find yourself in step with the quiet, nurturing yin nature of winter.

Monday, December 5, 2011

My Story Part IV: Restoring my Inner Core

Restoring my inner core has been my mission ever since teacher training. My exploration of the inner core and learning to deepen my awareness began in TT. I continued this learning-path with extended studies specializing in the inner core with my teachers, Ann Maxwell and Susi Hately Aldous, and I dedicated two 40-day practices to the inner core.

I had two signs that there was some change happening in my pelvis, sacroiliac joints and inner core: 1) my left SI joint moved for the first time ever. Now this didn't feel good, but I still took it as a good sign because at least both of my SI joints were moving instead of one stuck and one hyper-mobile. And 2) my outside-to-inside kick in Tang Soo Do (a Korean martial art) became so much stronger that I was able to kick the training pad out of my teacher's hands. Sounds like a funny way to measure change but I knew my body and I knew that I was making a difference by practicing deep inner core work.

Image from Wikipedia
This work is quiet, mindful and can make me want to scream. I had to learn how to find, use and move my pelvic floor, transverse abdominus, multifidi, adductors, and abductors, and I had to breathe while I did all this concentrating.

All this work has not eliminated my SI joint instability but it has become manageable. When I keep up on my work (as little as 5-15 minutes a day of inner core work) I can manage my pain. When I get lazy and don't do my work, instability comes sneaking back into my body. But now, after 3-4 years of work I can bring back stability in a short time. And at least I know I have the option of helping myself get out of pain.

Previously: My Story Part III: Teacher Training and More
Next up: I will detail some of the exercises I did that helped me strengthen my inner core and regain some control over my life by reducing my pain.

Monday, November 28, 2011

My Story Part III: Teacher Training and More

I signed up for teacher training in 2007 through Yoga North, the studio where I was starting to learn about the inner core, good alignment, and not pushing too far. I wanted to learn to use yoga to help my pain and to strengthen my body the way I needed. The 200 hour teacher training met one weekend per month for 6 months. The weekends were quite rigorous. The hours were something like this: 1pm-9pm on Friday, 7am-9pm on Saturday and 7am-6pm on Sunday. In addition to the weekend trainings, we had homework: studying philosophy, writing papers, doing a 40-day practice and journaling our experience, completing take-home tests, and teaching practice classes to a willing participant or two (read: family, friends or co-workers) so we could hone our new skills.

When I went through teacher training, Yoga North was in process of becoming more therapeutically focused, expanding on the Inner Core and Anatomy and Movement Principles from Susi Hately Aldous: move in a pure range of motion; move with the spine in mind; move from the larger joints first; when you are on your mat don't move into pain and if you are already in pain don't move into more pain; less is more. These were exactly the things I needed to learn in my body and in my practice.

Some of the inner core exercises we did seemed so simple I didn't believe they could help. We did things like laying on the floor with bent knees and squeezing a block between the thighs, tightening a belt/strap around the thighs and pressing out into it, and practicing pelvic floor lifts. We did awareness practices too like closing our eyes and barely moving into a pose using all of our awareness to focus inside. This is how I found out that Triangle was hurting me. I felt the tiniest of twinges at my right SI joint and realized, "Oh my gosh, that twinge was in the exact spot where I get the stabbing pain when I walk! I think Triangle is hurting me!"

This is about as far as I can safely go
in Triangle. Yeah, it's tiny but
I'm not in pain later.
This was revolutionary. Now that I knew what was hurting me I could avoid it. I was regaining control over my pain. OK sure, doing Triangle in such a tiny fashion that I barely moved was a bit of an ego-buster but I would do about anything to avoid the a-knife-is-stabbing-me-in-the-butt-pain I had been experiencing for at least 5 years during every walk I went on.

Of course the down side to this awareness is that now that I knew what tiny twinge to look for (future pain indicator) I found it in places I didn't want it to be: pigeon, extended side-angle, revolved head to knee pose, revolved seated wide angle, any and every forward fold, any and every back bend. Yeah, that's right, everything hurt.

So basically I had to go backward to go forward in my practice. I had to relearn the basics: core strength (block and belt work, pelvic floor work, transverse abdominus work), alignment principles (move in a pure range of motion; move with the spine in mind; move from the largest joints first), and less is more (when you are on your mat don't move into pain and if you are already in pain don't move into more pain).

Working with these tiny movements and this deep awareness made me feel like I was in "pre-yoga" class. For a long time I felt like I wasn't doing enough, I couldn't feel enough in my postures, I wasn't getting a good enough stretch. But these devious ideas lead us to do more than we should, push too hard, deplete ourselves with no cause, and quite possibly, cause ourselves pain.

Previously: My Story Part II: Yoga's Dirty Little Secret
Next up: Restoring my inner core and building stability.

Monday, November 21, 2011

My Story Part II: Yoga's Dirty Little Secret

When I found yoga I started to feel much better. My back and neck did not hurt so much, my mind felt brighter and I felt more in control of my emotions. I didn't have near as many monthly ups and downs.

But what was this new pain? What was this horrible, stabbing pain at the base of my spine that plagued me when I walked? Why did it hurt so much after shoveling snow or vacuuming the house? I was just done with a 4 year stint of working in Antarctica and traveling the world (where I shoveled and walked plenty). How could shoveling, vacuuming or walking be hurting me now? I didn't have this particular problem before. (Just all the other ones - ha ha.)

I continued practicing yoga. I even found a real, live class - not just yoga to a TV show. I got a lot of compliments on how flexible I was. My ego liked this so I pushed harder, stretched further, went deeper. And, no surprise, continued to have pain. I could not figure it out. I did not hurt while doing yoga; only while walking. I was pretty sure I was going to end up hunched before my time.

Fortunately, we moved and I had to switch studios. My new teacher, Ann Maxwell at Yoga North, was into teaching about the inner core, moving in a pain free range of motion, building awareness, and retraining forgotten muscle groups. She had been studying with Julie Gudmestad and Susi Hately Aldous and she shared what she learned with her students.

I learned that I did not have sciatica, I had SI joint dysfunction. I started to notice that the asymmetrical, hip-opening poses that I loved - triangle,  pigeon, easy seated forward fold - were not the best poses for my body. I was instinctively stretching the part that hurt (my hips and SI joints) but by stretching, I was pulling myself more and more out of whack.

I was starting to take pre-walk ibuprofen to mitigate the feeling of stabbing pain in my behind. Nothing ruins a walk more than feeling like you have a knife in your back. Finally, I saw a chiropractor. Even though yoga had been helping with my back and neck pain, I still had tons of misaligned bones. My neck curved the wrong way, my occiput was jammed, and my hips were uneven. I had good results with Chiropractic. I had fewer headaches and less pain walking. But my bones slid back out of alignment so quickly it was like they were greased.

I knew yoga was both helping and hurting me but I loved yoga. I didn't want to give it up. As a matter of fact, I wanted to learn more. I signed up for teacher training and started to learn how to strengthen my inner core from the arches up.

Previously: My Story Part I: 10 Years of Pain
Next up: Teacher Training, the Inner Core, Therapeutic Yoga and the concept of Less is More

Monday, November 14, 2011

My Story Part I: 10 Years of Pain

Some of you may know that I had multiple car accidents as a teenager, including a roll-over. I totaled 3 cars in 3 years and had a number of other fender bender type accidents as well. I don't know why. I don't feel like I was overly reckless (although I may have been), but certainly I was an inexperienced and unlucky driver.

After my 3rd car total (the roll-over), the insurance company put its foot down and said, "We will no longer insure you." This turned out to be ok. I grew up in the country but had just started college and wanted to live in town anyway. So, a friend of my mom's helped us find a rental room in another friend's house which was close to school and I moved right away.

Now in those days, I had never heard of yoga, chiropractic, acupuncture or really any kind of preventative medicine. So after each of my accidents (whiplash and all) I did nothing. I saw no doctor and did not receive any kind of treatment.

By the time I was 20 I was in chronic pain. I cracked my back and neck constantly which only brought momentary relief. I got massages but the muscle knots would return within a day. I didn't know what to do. I just figured that I would be in pain for the rest of my life. In addition to back and neck pain, my feet, knees and hips ached constantly. Often I had to take ibuprofen just to fall asleep at night.

In 1999 I found Yoga. By this time I had been in pain for 10 years. I was amazingly weak to start. I couldn't do down dog or plank. I could hardly hold my arms out for Warrior II for more than a few breaths. But I continued. I practiced yoga every morning with Yoga Zone.

This 1/2 hour show was a life saver for me. The stretches and the strengthening were amazing. But the real lifesaver was the subtle stuff: breath work, mindfulness practice, building awareness, learning the philosophy that nothing is permanent, learning to notice what I am clinging to.

Yoga did not "cure" my aches and pains, but it was a first step of taking control of my pain, my body, my mind, my thoughts, and my breath. But it also caused a few problems which I'll share in my next post.

Monday, October 31, 2011

Yang-Yin Class Re-cap

Yang-Yin class was another great time. Kristin and I co-teach this class about twice a year at Yoga North. It's one hour of Vinyasa followed by one hour of Yin. Folks seem to really enjoy the combination and the double-length class.

I've put up some pictures below and there are more from class on my Facebook page: www.facebook.com/DoRestorativeYoga.


We plan to offer this class again in February. Watch Yoga North's website for details.

Monday, October 24, 2011

Benefits of Prenatal Yoga

The below article was written by guest blogger, Allison Gamble. She says,

Prenatal yoga is the relatively new concept of practicing yoga to benefit the health of a pregnant mother and her in-utero child. While many women practice yoga to reduce stress, stay active, or practice religion, the first studies on the effectiveness of prenatal yoga have just begun to emerge. Current research from medical and psychology degree programs suggests prenatal yoga may be beneficial in reducing depression, improving sleep, reducing pain, and lessening birth complications.

Prenatal depression is a common condition associated with a number of negative symptoms and outcomes for mothers and infants. While treatment of prenatal depression is critical, many mothers-to-be avoid antidepressants, naturally concerned about taking drugs during pregnancy.

Prenatal yoga offers a drug-free alternative therapy. Yoga improves physical, mental, and spiritual health through controlled breathing, meditation, and specific posturing of the body. Because of its lower risks and natural basis, many pregnant women may prefer prenatal yoga to synthetic interventions for depression.

A study in the journal Birth: Issues in Perinatal Care suggests prenatal yoga could be a promising option for treating mild to moderate feelings of depression during pregnancy. According to the study's characterization, prenatal yoga is "particularly gentle in nature and emphasizes techniques to help women ease their labor and birth experience, build comfort with their changing body, and develop a strong bond with the infant."

The researchers also note yoga has an inherent positive force in that it simply seeks to enhance well-being, rather than treat a disorder, by emphasizing a whole body approach. Because prenatal yoga is nonverbal, and requires no therapist, yoga may better suit women who are uncomfortable openly discussing emotional or health problems.

Prenatal yoga also has the benefit of being relatively inexpensive, especially compared to drug treatments for depression. Yoga is already widely practiced around the world, and specialized prenatal programs have followed as its popularity has grown. You can also find plenty of prenatal yoga videos.

A study in Biological Research For Nursing Pregnancy also suggested parental yoga may help improve sleep in some pregnant women. Pregnancy invokes vast hormonal and biological changes, combined with the profound emotional adjustments that occur in anticipation of childbirth and parenthood. Among other resulting symptoms, many women experience sleep disturbance, which can also contribute to unstable mood and other issues.

The findings from the study are the first to suggest prenatal yoga in the second trimester can improve sleep as pregnancy progresses. Overall the study found that healthy women in the second trimester experienced better sleep with fewer awakenings and less wake time after going to sleep. These results are significant because doctors typically expect sleep will worsen as a pregnancy advances. Sleep during pregnancy is valuable as it may indirectly contribute to labor outcomes. Reduced time in bed and increased wake time during the night have been associated with longer labor and increased risk of cesarean birth in first-time mothers.

Various suggestions have been made as to why yoga helps reduce depression. The simplest may be that yoga helps to increase physical activity level and promotes mindfulness. Physical activity has been shown to improve sleep, and exercise might also be an effective preventive treatment strategy for back pain related to pregnancy.

Pregnancy is a stressful and taxing period of time for most women. Mothers want to ensure they're doing all they can to keep themselves and their babies healthy. Prenatal yoga is a great natural way to maintain health and well-being during pregnancy without recourse to drugs. Current research promisingly suggests prenatal yoga may help with prenatal depression, improve sleep, reduce pains and aches, and promote a healthy birth when the time comes.

Allison Gamble has been a curious student of psychology and its intersection with yoga since high school. She brings her understanding of the mind to work in the weird world of internet marketing with psychologydegree.net.

Monday, October 17, 2011

Free Yoga Nidra Practice

Yoga Journal is offering a free Yoga Nidra Practice by Richard Miller. YJ says,

Yoga nidra is the practice of conscious deep sleep. It's extremely effective for reducing anxiety and stress, and for facilitating deep relaxation. Practice this yourself with this 13-minute audio recording, and then share it with your class.

Enjoy!


Thursday, October 13, 2011

Schedule Update: Yoga Nidra, Yang Yin and Restorative Stations

Lots of opportunities for Restorative Yoga this month.

I am teaching these 3 classes at Yoga North. Please visit their site or call them at 218-722-YOGA to sign up. Each class generally fills to capacity so I recommend that you sign up early.

Thursday, Oct 13 is Yoga Nidra/Deep Relaxation: Class will consist of a variety of relaxation techniques including guided meditation & imagery, breathwork, and restorative postures. In the state of deep relaxation, tension is released from the body on a physical level, and the mind completely switches off. The relaxation response brings your system into balance. When practiced regularly, you will reduce your everyday stress levels and boost your feelings of wellbeing. You will also build deeper awareness and bolster your health with deep relaxation. All levels welcome.

Saturday, Oct 22 is Yang-Yin: A combo class I teach with Kristin about 2 times per year - once in the fall and once in the spring. We start out the class with an invigorating hour of Vinyasa (by Kristin) and follow up with a restorative hour of Yin (by me). Some yoga experience is helpful.

Thursday, Oct 27 is Restorative Stations: A relaxing, meditative class which uses props to allow a gentle opening in the body. Most poses are experienced while laying or sitting on the floor. I set up the room before hand with 4-5 stations. To see examples of class flow plans click here. All levels welcome.

Monday, October 3, 2011

Recapping the Return to Center Fall Retreat

Last January during the Winter Reflection Retreat many people expressed an interest in doing a two day retreat instead of (or in addition to) the one day retreat. Molly and I took this to heart and booked reservations at Camp Amnicon for both a 2-day fall retreat (Oct 2011) and a 1-day winter retreat (Jan 2012).

We just completed the 2-day fall retreat and I am now wondering, "How will we ever go back to the 24-hour winter retreat? How will we have enough time?" Well, I'll worry about that later. For now, a few pictures of the lodge, the hermitage cabins where Molly and I sleep, and the retreat group all together in the dining hall with Bonnie the Cook and Kelly the Camp Host in the back.

The entrance to the lodge.

Inside the lodge, the circle is set (until we go wild with all of our yoga props).

The "Sunrise" hermitage cabin (Molly stays in "Sunset"). The cabins are available to anyone for a very reasonable rate.

The inside of the "Sunrise" hermitage. So sweet.

The retreat group in the dining hall, mouths watering in anticipation of Bonnie's delicious cooking.


Overall, another wonderful retreat with fantastic weather, great learning and sharing, fun hikes, canoes and campfires, and much relaxing and eating. Thank you everyone for showing up and being present. Until next time, Sara Duke and Molly McManus

ps1 - Look for more pictures and video on Facebook: www.facebook.com/DoRestorativeYoga.
ps2 - Look for future retreat dates at www.YogaNorthDuluth.com/events.

Monday, September 26, 2011

DVD Review ~ Yoga for Total Back Care

 Yoga for Total Back Care features vinyasa flow teacher Annie Carpenter.

This DVD features two 45-minute sequences which target the back's major problem areas: one for the lower back and one for the upper back, neck, and shoulders.

The first sequence I tried was for the lower back. I had been working on a few different house projects through out the day: painting in the morning and then hauling, mixing, and pouring concrete for a couple hours in the afternoon. My low back was really feeling sore and stiff and I knew I needed to do some yoga. So, I decided to try out this DVD.

Carpenter started us on our backs with pelvic tucks and tilts, eased us into Supta Padangustasana and then led us into some core work. She brought us to upright and we did a few long held lunges with down dog transitions and then moved into standing poses like Warrior I, Revolved Side Angle and Wide Leg Forward Fold with a twist. She emphasized keeping a level pelvis and keeping our breath steady and smooth. We finished on the floor again with some block-assisted Bridge Poses, gentle twists and a hip stretch.

After Savasana I felt great. My low back was not hurting me at all. After carrying all that concrete I was worried but this sequence helped me get out of pain.

I tried the Upper Back, Neck, and Shoulders sequence the next day after painting for about 6 hours. My right arm, shoulder and neck were very tight and I was getting a headache on the right side too. I try to paint with both hands to bring balance but I can only manage to use my left hand about 20-25% of the time.

This sequence focused on noticing the differences that you might have between the right and the left side, building strength and releasing tension. We started out on our backs again and rolled our heads slowly from side to side which felt great. Then we worked on some shoulder stability with blocks, transitioned into table for cat-cow, down-dog and hanging fold. From there, we moved into slow flowing postures: sun breath + chair, WII + Extended Side Angle, and Plank to Down Dog flow. We came down to our bellies for a Belly Boat flow and ended with some seated arm stretches - Cow's Face arms and Eagle Arms. After a gentle twist we settled into Savasana.

I didn't connect with this sequence as much as the first one. But perhaps that is because it was more challenging and I felt like relaxing, not working. I know I need more strengthening though because I often have ribs out of alignment in my upper back which tells me I don't have enough stability.

I was a little worried that this would be too vigorous a practice for me to enjoy but I was pleasantly surprised to find a smooth, calm, and flowing practice that really did make my back feel better - especially the low back sequence. Over all, I liked the DVD and would recommend it.

Monday, September 19, 2011

Book Review: Sideways on a Scooter

I am signed up for the Duluth Public Library's Daily Book Review (click here to see the categories you can sign up for). I receive a book review every day by email and if I like the look of it I can go on line and request the book to be held for me. When the book is in, they send me an email and I have a week to pick it up. The DPL is the best!

Anyway, "Sideways on a Scooter ~ Life and Love in India" piqued my interest and I requested it (but not quick enough - at least 4 people were in line before me). This book is a memoir of/by Miranda Kennedy in the years she worked as a foreign correspondent out of India.

I guess I was expecting something more romantic and "happy ending" - more like "Eat, Pray, Love." But what I got was the gritty truth about the enigma that is India. Kennedy explores race and class/caste issues in depth and left me feeling quite uncomfortable with the juxtaposition of yoga and yoga's origins. Kennedy does not even explore yoga (well, there is a Women's Fitness Center where there is a yoga class but the women really just go to the center to socialize and get away from the prying eyes of men), but I am struck by the "all people are equal and we are all divine" message of Western yoga and the reality she saw of complete caste inequality; of Indians purposely keeping the castes in place and being happy about it; of women purposely keeping other women down. Ms. Kennedy does a great job of diving in to Indian culture and helping us understand it. She appears to be very uncomfortable in her situation but she sticks it out, learns, and shares her learning with us.

I am still reeling from the book which to me says that this is one we all should read - especially if we have a romanticized notion of the roots of yoga, which apparently I do since I am stunned by the book.

Monday, September 12, 2011

DVD Review ~ Yin Yoga

I am always on the look out for new Restorative, Yin and Deep Relaxation information. I recently purchased "Yin Yoga," a DVD by Kim Eng with an introduction by Eckhart Tolle.

The DVD features two practices plus a lecture/introduction with Eckhart Tolle. I came away from the introduction with the reminder to stay present in the practice, notice if you have discomfort or if your mind wanders. Bring the mind back to the present, time and time again. Do not run from discomfort; explore it.

Ms. Eng offers two practices: The Full Practice - Complete Yin Yoga (75 minutes) and the shorter Daily Practice (60 minutes) which is a copy of some of the poses from the full practice. Each practice is soothing and well presented. The style is voice-over set to Ms. Eng's practice in a beautiful garden. She did offer modifications and talked about using props but did not often show the props or use the props herself. I find in my classes that maybe one person per 15 does not need props - everyone else does. But I know that "no props" is more in the Yin style so I was not expecting to see any props or even talk about using props so I was pleasantly surprised.

There was no information pamphlet / table of contents in the DVD jacket which is a disappointment, but this seems to be the norm these days. However, this is definitely a DVD that I will watch / practice with again. I really enjoyed it. If you want more info, there are quite a few reviews on Amazon - some of which are very detailed and helpful.

Friday, September 2, 2011

Fall Reflection Retreat ~ Best Price Deal Extended


Return to Center Fall Reflection Retreat the weekend of September 30th

Think... camp... for adults.


This weekend retreat at beautiful Camp Amnicon, which is just 30 minutes from Duluth, will include many opportunities for group yoga daily, deep relaxation & meditation, lecture & conversation, hiking, sauna, rest, good food, & great community.

There will also be a guided Amnicon River Canoe trip, fall color hike, bonfires and opportunities for outdoor contemplation or worship. Makes an excellent gift for yourself or a loved one.

Led by Molly McManus & Sara Duke

Arrive: 6 pm Fri, Sept 30th
Depart: 4 pm Sun, Oct 2nd

Cost*: $225.00 or $202.50 if you register yourself online before the deadline. Use the promo code "10fall" when you check out online to receive an additional 10% off your enrollment.
$240.00 starting September 12th.

*Price includes Saturday and Sunday meals, daily yoga classes in postures and philosophy, guided canoe trip and the use of Camp Amnicon facilities.

Sign up online at Yoga North by clicking here or call the office at 218-722-YOGA.

Monday, August 22, 2011

A Practice of Noticing

Continuing on with our truth-seeking and self reflection....

I found an insightful article by Sally Kempton talking about how to delve into your own feelings and peel back the layers of emotions wrapping the heart. Here's the exercise she details:

Start with Yourself. If you want to practice with intense energies, a good way to start is with your own feelings and moods, and to start small. Stephen Levine once wrote that working with heavy emotional issues can be like getting into the ring with a 500-pound wrestler—if you haven't trained for it, the wrestler will throw you in the first clench. One of the best ways to train for working with energy is to practice during private moments of meltdown.

One of my favorite times for this kind of practice is the onset of road rage. Like many otherwise reasonable people, I have an inner road warrior who emerges only when I'm alone behind the wheel. He's mouthy, cynical, easily offended—a cross between a New York City cabbie and one of those eccentric hit men from a Quentin Tarantino film. There's a lot of energy in this persona, however. So when I notice myself having snarly private dialogues with a driver who has cut me off at an exit, I try to use the occasion for exploring the energy inside my anger.

You can do this too, anytime. First, take a moment to remember one of your characteristic heavy emotions or the last time you were very angry, grief-stricken, or scared. When you've found the feeling you want to work with, here's what to do:

Acknowledge your feeling. Notice and identify the fact that your inner world has been rocked by an intense, primitive feeling. This is especially important when you've been ambushed by an emotion. It helps to say clearly to yourself, "I'm feeling angry," or, "I'm sad," or, "I'm upset." You don't have to analyze the feeling or even think about where it's coming from.

Pause. Stop yourself from acting on the feeling. To do this, focus on your breathing, following your breath as it moves in and out through your nostrils.

Get grounded. When we're experiencing strong emotions, we often lose touch with our physical body. To get grounded inside your body, bring your attention to the sensation of your feet on the ground; if you're sitting, feel the contact between your buttocks and the cushion or floor.

Bring your awareness into your heart. Once you're grounded, find your center in your heart—not your physical heart but your inner heart, the subtle energy space in the center of your body. If you touch your finger to the spot on your breastbone right between your nipples, you will probably find that there's a slight hollow there and even an achy feeling. Behind this little hollow lies your inner heart. Drop your attention into this center, using your breath as an anchor. Breathe in and out as if you were breathing in and out of your heart. Do this for a few minutes.

Explore the energy in the feeling. Once you have found your center like this, focus again on the feeling you are working with. Where is it in your body? How does it feel? This is not an analytical process; it is more of an exploration. You are giving yourself permission to fully feel and explore the inner sensations created by anger, sadness, injured pride, or fear. Feel whether the emotion is hard or prickly in your body. Notice if there's a color field around your mood. Someone told me that his depressed feelings actually feel grayish.

Let go of the story line. At this point, you'll notice that certain thoughts are attached to your particular emotion, thoughts that frequently begin "How could he?" or "I always..." Acknowledge these thoughts and then let them go, keeping your attention on the feeling rather than getting caught up in your personal story line.

Some people ask, "Suppose there is content in my feeling that needs to be dealt with psychologically or practically? Am I supposed to just let it go?" For the moment, yes. For this particular process, it's important to let go of believing the story that your thoughts and feelings are telling you. If you sense that something in these feelings or in the situation that provoked them needs specific action or attention, take note of it! You'll come back to it later on.

Hold the feeling inside your heart until it dissolves into awareness. Consciously bring the feeling-sense of your emotion into your heart. Hold the feeling inside the energy space in your heart. As you do, let your heart space expand, gently and slowly, until you have the sensation that there is real space around your feeling. Now notice what happens inside you, how the energy inside your anger or grief shifts. It might become sharper and more intense for a while, or it might begin to soften around the edges, to become less specific, less prickly or swampy.

It's important to realize that you aren't just trying to make yourself feel better. You are in a process of shifting your perspective about this feeling. Your intention is to explore its energy and to let that energy resolve itself back into its root, into the core energy of every feeling.

When we bring our heavy emotions into our heart space, it is as if we are bringing them into a place where they can be safely cradled. Psychologist Rudy Bauer has a great way of describing this. He says that holding our intense feelings in our consciousness is like holding hot coals in a basket. The basket contains the coals and allows heat to build up so that we can warm ourselves by their fire, but it also keeps the coals from burning us.

In this way, we can harness the energy inside our intense emotions and use it as a vehicle to move beyond our ordinary mind and toward the source, the Self, where we are powered and supported by something much larger than ourselves—something impersonal and yet loving, something that has no content and yet is full of wisdom. Abiding in this place, we understand what Rumi really meant when he said that fighting and peacefulness both take place within God. Whatever the quality of the times we live in, when we know how to enter the energy of intensity, we have discovered a doorway to the infinite.

Sally Kempton is the author of The Heart of Meditation. She also teaches Awakened Heart Meditation workshops. (For a schedule, visit www.sallykempton.com.) 

If you want to read the entire article click here.

Monday, August 15, 2011

More Truth

I'm still contemplating the ramifications of truthfulness as I was discussing in the last post. What if we don't like what we see when we look inside ourselves? Or what if we are so scared to admit that we have value that we cannot look inside ourselves? What do we do then? Well, we keep trying. We use the Yamas & Niyamas to guide us and we practice non-harming (to self and others) and tapas (staying in the heat of the fire, i.e. staying with the discomfort and examining it). And we practice surrender - we go with life instead of fighting all the time.

Here's a little exercise. Ask yourself these questions:

1. What am I most afraid of?

2. If I could do anything at all, no restraints on time and money, what would it be?

3. What do I love most about myself?

Usually the 1st one is pretty hard to answer because most of us have to admit a fault here like, "I'm afraid everyone will see that I am a fraud. I don't really know what I am doing." The 2nd one can get pretty wild, "I'd travel the world, I'd quit my job, I'd learn another language," etc. Now the 3rd one, that's a doozy. How many of us can admit that we like anything about ourselves at all? Much less that we love something about ourselves.

Go ahead, jump in the fire and admit to yourself how many things about yourself are great. I'll start you off, "I love that I laugh a lot, I love that I'm learning to really see myself, I love that I am creative." Go on, keep on making your list.

ps - Here's an article from Yoga Journal to help you along a bit: Polishing the Mirror - the Practice of Self-Reflection.


Monday, August 8, 2011

Seeking the Truth in Yourself

Image from Wikipedia
I recently watched the movie Invictus, a portrayal of Nelson Mandela, acted by Morgan Freeman, set in the 1990's, the time period just after Mandela's release from 27 years of unjust incarceration. Mandela was elected  president by the first truly free election, the first multi-racial democracy, in 1994.

Mahatma Gandhi's non-violent resistance, satyagraha ("truth force"), influenced Mandela's approach to ruling in South Africa. This was portrayed wonderfully in the movie. Mandela's ability to see the truth in himself--his greatness, his flaws, his prejudice, his desire for revenge, his desire for peace--allowed him to rule from a place of equanimity. His ability to look beyond himself and ask, "What is the best course of action for all people of South Africa?" made him an incredible leader.

Since watching this movie I have been wondering what would happen if we could all be so fearless? What would happen if we could all look inside ourselves and see both the greatness and the smallness that makes us who we are? Could we recognize what hooks us if we could see ourselves with perfect truthfulness? Could we find love and forgiveness in our hearts for ourselves and others the way Mandela (and Gandhi) did?

Om Shanti, Shanti, Shanti. Peace, peace, peace.

Monday, August 1, 2011

Many forms of Meditation

Defining meditation is an elusive thing. I think it's hard to define because there are so many styles. There is not just one way to meditate. Frank Jude Boccio does a good job giving a brief explanation of a few types of meditation in his article Meditation for Everybody. I love how he explains meditation here:

A good deal of mystique has grown around meditation, yet it is one of the most natural of our human capacities. You've no doubt had moments in your life when you were not thinking or analyzing your experience, but simply "going with the flow." In these moments, there was no past or future, no separation between you and what was happening. That is the essence of meditation.

Contrary to a common misunderstanding, meditation is not a limiting or narrowing of our attention so much as it is a focusing on what is relevant. Our attention can be narrow, as in observing our breath, or broad, as in cooking a five-course dinner. When the mind is able to focus on what is relevant to what is happening now, we experience ourselves as being at one with what we perceive. This experience is deeply joyful, as we become freed from the illusion that we are separate from everything else in the universe. In fact, meditation isn't a withdrawal from life but a deeper, fuller presence in life.

Read his article in Yoga Journal to understand a bit more about a multitude of meditation styles.

Monday, July 25, 2011

Grounded in Gratitude

A few years ago I wrote an article called Finding Contentment about a gratitude practice I like to do. Today, I read an article by Frank Jude Boccio which talks about this and more. Here's a little excerpt:

On the surface, gratitude appears to arise from a sense that you're indebted to another person for taking care of you in some way, but looking deeper, you'll see that the feeling is actually a heightened awareness of your connection to everything else. Gratitude flows when you break out of the small, self-centered point of view—with its ferocious expectations and demands—and appreciate that through the labors and intentions and even the simple existence of an inconceivably large number of people, weather patterns, chemical reactions, and the like, you have been given the miracle of your life, with all the goodness in it today.

If this speaks to you and you want to read the rest of the article, visit Yoga Journal.

Monday, July 18, 2011

Yin Style Reclining Hero's Pose ~ Supta Virasana

Enjoy Yin Style Hero's Pose

Restorative style Virasana, as explored in the previous post, is a great place to start lengthening your quads. But at some point your body may be open enough to try Yin style Virasana, known as Saddle Pose. One of the beautiful things about Yin is that there is not a huge need for props like there is with Restorative. But still, there is some prep work involved.

Setting up for the pose:
For this version of Virasana, I like to start by laying on my back. Some folks are limber enough to sit on their shins with their bottoms on the floor and then lay themselves down backward but for most folks that is a bit much to start with.

Coming into the pose:
So, laying on your back, roll a bit to one side, bend your top leg's knee and pull that foot toward your bum. Try to roll back to the floor. This is Half Saddle or Half Reclining Hero's Pose.


As you linger here, you may find yourself wanting to pull your other leg in and open like so:


If these both seem crazy but you want a bit more stretch than the Restorative style Hero's Pose is giving you, then I recommend trying Supported Bridge Pose with a quad stretch:

This is nearly the same effect, as far as stretching the quads, but it gives you more space to tuck the foot towards the same side hip since the bum is off the floor. You can turn the foot under (toes point toward the same side shoulder) or you can draw the ankle toward you and keep the toes pointing away. Do one side at a time and try to maintain good alignment: shoulder, hip, knee in the same line. This video by Kira Ryder details the process.

While in the pose:
Keep breathing, keep observing the pose in your body, and allow the body to open at its own rate. Commit to the stillness but do allow yourself to adjust your body as you settle deeper in. Breath into any places where you habitually grip and try to soften. Stay as long as you are comfortable.

Coming out of the pose:
If you are in Supported Bridge Pose, lift your bottom, slide the block out from under you and come to rest on the floor. If you are already on the floor, roll to one side slightly and untuck one foot and then the other. If you were practicing 1/2 Hero's take the 2nd side. After the second side you can be done or you could try the full version of the pose. Take a few sacrum circles and then Little Bridge Pose to bring back stability.

This posture was super hard for me at first. I thought I had knee trouble but it turned out it was just tight quads. After a few months of practicing this posture regularly - starting with the Restorative style supported Hero's and eventually working to the Yin style Hero's - my knee discomfort has gone away.

Monday, July 11, 2011

Supported Reclining Hero's Pose ~ Supta Virasana

Enjoy Supported Reclining Hero's Pose

Hero's Pose can be a very tricky posture to come into for anyone with knee issues, tight quads or low back/SI joint problems. Luckily, with props, this posture can be made available to most people--comfortably--not just to "get through it."

Setting up for the pose:
Gather a number of different props: a few pillows/bolsters, a few blankets, and a couple of blocks. Test your ability to sit on your shins with your bum on the floor between your feet. If this does not happen for you in an upright, seated position, it is not going to happen in the reclining version either. You need support.

Set up a bolster or a thickly-rolled blanket behind you lengthwise. Place a block, bolster, or additional pillows under the end of the bolster where your head is going to lay to create a ramp set-up. Like so:

This bolster set-up is good for Reclining Hero's Pose or for Reclining Bound Angle.

Coming into the pose:
Sit in Dandasana (sit on your bum with legs straight) in front of your bolster ramp. Get very close to your props - let your back body touch the bolster. Bend one leg and tuck your foot by your outer hip. Carefully lower your body toward your bolster ramp, coming into Supported Reclining Half Hero's Pose.


If this feels ok and you want to go for full Supported Reclining Hero's Pose, come back to seated and tuck your other foot next to your other hip and repeat the careful laying down process.


If your knees are saying "NO WAY" then you need more propping. Give yourself something to sit on - like a folded blanket or a small bolster and make your bolster ramp higher. With these modifications, most folks should be able to do this pose. I've only ever had one student who absolutely could not do it.

While in the pose:
Keep breathing, keep observing the pose in your body, and allow the body to open at its own rate. Commit to the stillness but do allow yourself to adjust your props and your body as you settle deeper in. Notice if you are gripping the knees, quads, hips or back (or of course the usual places like the jaw, forehead or shoulders). Try to let these parts soften. Stay as long as you are comfortable.

Coming out of the pose:
To come up, support the torso with the hands on the floor, and either push yourself to a seated Hero's Pose or roll to one side slightly and untuck your feet, one at a time. If you were practicing 1/2 Hero's take the 2nd side. After the second side you can be done or you could try the full version of the pose.

This posture is great for creating length in the quads. There may be discomfort in the knees to start but by lengthening the quads this problem can go away - at least for me it did. However, if the knee discomfort is sharp, stabbing or causes you to hold your breath, I would recommend doing this pose only with supervision.

Happy Exploring!

Monday, July 4, 2011

Do Restorative News

I've got a number of schedule updates for the week of July 4-11. Here goes...

1. As stated in my previous post, Do Restorative Yoga is finally on Facebook. Come on over and "like" the page to get updates on the newest postings, upcoming events, schedule, reviews and more.

2. No class at Maurices on Thursday, July 7th due to Sidewalk Sales. We will resume normal schedule on Tuesday the 12th.

3. I'm subbing for Kristin's Vinyasa class on Thursday, July 7th at Yoga North: 5:30-6:30 pm. I know I'm not Vinyasa trained but I know how to do Hatha Flow so I think it will go ok.

4. I'll be teaching a Yin yoga class at 3 pm at the Twin Port Bridge Festival on Saturday, July 9th. Lot's of great stuff going on down at Bayfront for this fest: music, yoga, kids activities, motivational speakers, snacks, great lake views and more. Visit Laughingstock Design for more details.

5. I'll be subbing for Dorothy at the Duluth YMCA on Monday, July 11th for the 5-6 pm class. I will probably teach a combo class - Therapeutic and Yin.

Hope everyone has had a fun-filled 4th of July weekend.

Friday, July 1, 2011

Finally on Facebook

Do Restorative Yoga is finally on Facebook. Come on over and "like" the page to get updates on the newest postings, upcoming events, schedule, reviews and more.

See you there.

Monday, June 27, 2011

Supported Reclining Bound Angle

Blanket-foot Bound Angle

I've detailed other versions of Bound Angle and Reclining Bound Angle before (here and here). But this version is one of my favorites. It's easy to do at home or at yoga class. All you need are two medium-thick or thick blankets (three if you want one more to cover up with).

Setting up for the pose:
Roll one of your blankets into a small bolster and place it behind you lengthwise. It should be long enough to support your whole torso and your head. The blanket roll should be right up against your sacrum and when you lay on it your head should not be hanging off the end.

Fold your second blanket into a hotdog fold (fold in half lengthwise) and lay it down at the end of your mat by your feet (perpendicular to your mat).

Coming into the pose:
Sit in front of your bolster-rolled blanket with bent knees and your feet on your hotdog folded blanket. Fold the "hotdog folded" blanket over your feet making a "foot sandwich." (Now your blanket is folded twice, lengthwise, with your feet inside).


Pull the ends of your foot blanket toward you, tucking the feet in snugly.


Lay down on your bolster-rolled blanket and get comfortable. Your behind should be on the floor but the rest of your back and your head should be on the blanket roll. Let your knees fall open to the sides, tucking the ends of your "foot sandwich" blanket under your knees and/or hips to support the bound angle opening.


While in the pose:
You can experiment with what feels the best to you. If your head is tipped way back or you feel unsupported in the neck, place a folded blanket under the head and neck - not so thick that your head tips forward. Your head should be level with the body or slightly tipped back.

If your inner thighs feel too stretched, wad up your support blanket a little more and give your knees more height.

Send your arms out to the sides, palms up to encourage the heart center to open. If you feel too much pulling across the chest or through the arms, put a folded towel or blanket under each lower arm, supporting all the way to the fingertips.

If any other place in your body feels uncomfortable or unsupported, experiment with more props until you feel at ease.

Keep breathing, keep observing the pose in your body, and allow the body to open at its own rate. Commit to the stillness but do allow yourself to adjust your props and your body as you settle deeper in.

Coming out of the pose:
To come out, you can either help the knees come back together or you can send your legs straight out to stretch. Either way, roll to one side to rest before coming back to seated. A nice follow-up pose is a Supported Side Reclining Twist.

Enjoy!

Monday, June 20, 2011

DVD Review ~ Yoga for Morning, Noon & Night

Yoga for Morning, Noon & Night features Jason Crandell, a contributing editor for Yoga Journal who also teaches at YJ conferences and leads workshops and retreats around the world.

This DVD includes three yoga sequences of about 20 minutes each - perfect for sneaking a bit of yoga into your day, even on a busy day.

The first practice is a gentle wake up session featuring Half Sun Salutations (Sun Breath) plus a nice shoulder opener, side bends, and core strengtheners. I loved the pace Crandell led. I felt very taken care of.

The second practice picks up the pace a bit, using Sun Salutation A, standing poses and back bends. Even though the practice was more vigorous  than the first one, I never felt rushed. I was able to keep my breath deep, smooth and steady. In a faster paced class I think it is easy to forget your breath but Crandell did not let us do that. Maintaining relaxation and breath awareness during a flowing practice is something I really appreciate.

The third practice took us down to the floor for seated and supine poses. Mostly we worked on hip and hamstring openers plus twists and back bends - with a few down dogs thrown in there as decompression after back bends. I felt very relaxed after this practice.

Over all I enjoyed this DVD quite a bit. Crandell's voice was soothing, his pace (even in the faster paced session) was spacious, and I appreciate his emphasis on paying attention to your body and not pushing yourself beyond your edge.

I watched his interview after the three sequences were over and found out that he had had a serious back injury in the past. Perhaps this is why I felt so comfortable with his teaching: he knows what it is like to be in pain and does not want his students to ever go to that place.

Monday, June 13, 2011

Feeling the Bliss

The article below was written for Do Restorative Yoga by Diane Kistler, a yoga teacher from Philadelphia, who teaches at Moyo Yoga. Diane writes:

I am just coming off the glow of an amazing Restorative series that we offered at Moyo Yoga in Skippack, PA. I can only hope that the students are sharing this same glow. While exhausting to put together each classes lesson plan, practice and take photos of each pose, and then post the class on the Feeling the Bliss blog, it was well worth the effort.

I digress a bit. My interest in Restorative Yoga began quite innocently. I took a summer retreat at Kripalu with Jillian Pransky. It was titled "Yoga and Nature" or something like that. I was immediately drawn to this practice during the retreat.  I continued to study with Jillian in the fall at Yogaworks with her Restorative Teacher Training Level I & II. Her influences are Erich Schiffman, Judith Lasater, Donna Farhi, Integrated Yoga Therapy, Dr. Ruella Frank, Dr. Herbert Benson and the Relaxation Response and so on. She has a very nurturing, down to earth approach to this practice but is steeped in much knowledge and experience.

Following the training, I was super psyched to try this practice out on others.  Luckily, a few wonderful students at the studio volunteered. We spent several weeks one on one trying out poses, getting feedback, and adjusting where we needed to.  I am grateful to those first few students who trusted me as a newbie.  Now I needed to take more classes myself and feel the practice first hand.  I came up with close to nothing in the Philadelphia area in late 2010.  A few classes but too far away.  I really didn't want this learning and practice to get too far out of my range.  In early spring of this year (2011), I noticed that area yoga studios were now offering weekly classes and monthly workshops.  I've now been able to supplement my training with the experience of the practice itself.  I feel fortunate that there are so many offerings.

I knew the time was ripe to begin a class at Moyo.  Moyo has been offering more and more series so the students can build upon their practices in things like alignment, prenatal and beginners yoga. A series in restorative yoga is the perfect platform because this practice requires building upon "Remembered Wellness" tapping into the Relaxation Response. We organized it to run for 4 weeks with a one hour class each week. We had 10 participants all with a varied health history.* 

I drew up lesson plans for each class and my assistant, Carmen, and I practiced the poses prior to class.  Carmen and I set up 10 stations along the wall (students did not move to other stations).  We had the necessary props for the poses that day.  In addition, we usually had extra blankets, cushions, even Webkinz stuffed animals to place in hands.  Currently, we are somewhat limited in props!  A typical class was comprised of a reflection on the practice, a breath, 3 poses and savasana (ideally).  I followed up with an email to students pointing them to the blog, so they could practice at home.  The blog had the classes poses, the breath, recap of a concept like sankalpa (which they set at the beginning of the series),  seva, or gratitude journaling and links to useful information.

Not everything was perfect.  A few poses were challenging for some students body types, or spinal issues.  After the first pose, the room began to resemble a slumber party as props were moved here and there.  The limited prop situation challenged us.  By far, the biggest complaint from students is that the series was not long enough!  As teachers, Carmen and I learned a lot about observation and letting go.  After getting students settled in a pose, the more active adjustment, we would hang back and observe the students.  When we saw, tension in various areas of the body or someone clearly not comfortable, we may softly say to that person, "Can I do something to make you more comfortable?".  Or sometimes, we did not, because we felt that they wanted to be left alone.  We noted the discomfort, and moving forward would adjust or set-up a pose differently.  All the while storing this information in. We learned so much about our students and about ourselves along the way.

We just completed a Memorial Day workshop and will begin a June series on the 7th.  Just like yoga, this practice and our teaching is always evolving.  Never a dull moment.  Our studio is very interested in continuing a Restorative and Therapeutic  program, which I will develop and lead supported by an awesome team.

A major "shout out" to Sara Duke whom without her heart filled love and joy of Restorative Yoga, I wouldn't have found an awesome model to go by.  I really appreciate that you have provided so much to your students and to fellow teachers.

*Note: for future series, we will request a health history prior to start to customize classes and adjustments to any conditions.

Diane's bio: I've been teaching yoga for over 5 years and a student of yoga for over 13 years. My "niche" is teaching gentle Hatha yoga to many populations. I also teach restorative yoga, senior chair yoga, and prenatal yoga. I've been fortunate to have been able to share my love of yoga with women who've been abused physically, mentally and emotionally. And sometimes my two girls join me in some fantastic yoga adventures at Kripalu. I'm in a really good place now and what a journey it has been. I love what I do and I do what I love. Isn't that cool?

Visit Diane's blog at: Restorative Yoga - Feeling the Bliss.

Monday, June 6, 2011

Om Shanti Shanti Shanti

The meaning of Om Shanti Shanti Shanti as found at amritapuri.org.

The mantras chanted in Amma's ashrams at the end of arati and archana are called shanti mantras1. Therefore to conclude each one, "shanti," which means "peace," is chanted three times. As a spiritual aspirant, one chants shanti in desire for the occurrence of circumstances conducive to a spiritual education. But these mantras can be chanted for peace in a general sense as well. Shanti is chanted thrice not for emphasis but because disturbances are of three distinct categories. In Sanskrit, these are referred to as adhi-daivikam, adhi-bhautikam and adhyatmikam.

Adhi-daivikam literally means "mental disturbances that come from God"—i.e. things that are utterly beyond our control: hurricanes, earthquakes, volcanic eruptions, floods, tsunamis, etc. We have no control over these types of disturbances. So when we say the first shanti, we are praying, "O God, may we be protected from these obstacles that are beyond our control."

Adhi-bhautikam literally means "disturbances that come from the world." That means anything stemming from the world around us—mosquitoes, noisy neighbors, barking dogs, the phone ringing, family arguments. As opposed to the first category, we have some control over this second category of disturbances. We can use mosquito repellent, we can call the police on our neighbors, we can turn off the phone, we can leave the place altogether, etc. So this shanti means, "O God, may we be protected from the people and surroundings."

The third type of disturbance is the most powerful and, at the same time, the only one over which we have total control. Adhyatmikam means "disturbances stemming from the self." For one who is still identified with the ego, the people, places and things of this world stimulate one of two reactions in the mind—attachment or aversion. Whether we physically see someone we consider our enemy as we walk down the street or remember him during meditation, the mental turbulence that results is the same. Lust, jealousy, anger, sorrow, and hatred destroy our peace. During meditation, pleasant memories also distract us. Hearing the sound of a jet plane flying overhead may mentally carry us off to a fabulous holiday we once took. Only after 10 minutes of daydreaming do we realize we have lost focus on our object of meditation.

In fact, Amma says that the ego is the only true obstacle to mental peace. This third shanti is therefore the most important one, because even if we are free from outside disturbances, if the inner realm is not calm we will never know peace. Conversely, once we have found inner peace, no external force can ever disturb us. So chanting this third shanti is akin to praying, "O God, please remove all the inner obstacles."

There is one more element to the three-fold chanting of "shanti," and that is the silence that follows each repetition. If chanted properly, this silence is the emphasis: shanti... shanti.... shanti....

This silence is representative of true peace, the peace of an Enlightened One like Amma. For the spiritual seeker, peace is the goal. For an Enlightened One peace has been realized as his very nature. To have be have equipoise in every situation in life verily is realization.